Friday, June 6, 2014

Portofino: A Blast from Loes Hinse Past


Funny thing is I don't remember the insanity in this one. I just remember how much I liked the dress and how well the bodice stayed in place for a "wrap" style. This is no longer available for purchase, but I would be glad to lend you mine to copy. If you are like me, and most of you are, you just might have a copy of your own in your pattern collection. After looking at this again, I just might make this in the sheer. Imagine, I could just make it with no search and destroy fitting problems.

I am resurrecting and updating my old pattern reviews. I seem to have misplaced them in the computer transfer. I am foraging on the Internet for the pic and reviews where I originally posted them. It is a nice little walk down sewing memory lane. Glad you can join me in the stroll.

Portofino Review

Portofino, Portofino, how did I alter you? Let me count the ways. Do you hear the faint sound of hysterical laughter in the background? Pay no attention; that is just the sound of me getting closer to the edge of insanity as I made this garment. It didn’t help that I decided to make this to wear to a wedding the next day. I thought this would take me 4 hours to make at the most, and it would have except for the gazillion tweaks and several alterations.


Description of the pattern:

The Portofino, by Loes Hinse, has a separate bodice attached to an A-line four panel skirt with a godet at both the center front and back. The bodice is a modified princess seam from the shoulder/neck area with a wrap front insert. It has very fitted elbow length sleeves.


Why did you choose this pattern?

I thought the v neck wrap front combined with the higher waistline would be flattering. I also like the idea of the godets inserted at the hemline to add fullness to the skirt without adding excess fabric hanging from the waist and over the hips.


What fabric did you choose? Why?

I refer to this fabric as evil black polyester crepe. Sewing on it is my penance for stockpiling way too much fabric over the years. I am not a big fan of 100% polyester because I always feel as if I am marinating in it. I am rather baffled as why I bought so much of it for a suit way in the distant past, but it is great fabric for wearable muslins. It is actually a nice fabric, not all that uncomfortable to wear, it drapes well and looks good, but it is evil to sew. It ravels incessantly, slips, and slides, then revolts at being creased in exactly the place you want it. I have kept it around because I can make something out of it when I want to experiment on fit and in the end be rewarded with a garment I can actually wear. It is rather mysterious because I keep making things out of it and I always seem to have enough left for something else. I think it may have come to life in my fabric stockpile and procreates in the dark.


What modifications did you make to the construction process recommended for this pattern?

If I were working with a very sheer lightweight fabric I would have used the recommendations for finishing the neck edge, skirt and sleeve hems. However, the evil black polyester crepe would have totally rebelled with such skimpy amounts. The pattern instructions call for finishing the fabric edges of the sleeve and skirt hem by serging or with a zig zag stitch, then it asked that the sleeves be turned under ½ “ and the skirt hem 3/8” to topstitch from inside the garment to reduce puckering. I made the hem 2” on the skirt and used my blind hemstitch to hem. The sleeves have a 1” hem and I topstitched it. I finished the edge of both with a zig zag.

The neck edge was to be finished in the same manner with only 3/8” being turned under. I really don’t feel this is sufficient for most fabrics but especially not for working with my friend. The shoulders and neck support a great amount of the weight for the dress. My fear was that it would stretch out of shape with time. I ran to JoAnn’s at 8:30PM to pick up something that could be used to attach at the neck edge and reinforce the area. I had in mind twill tape because I thought it could be shaped to the moderate neckline curve. It has been a long time since I bought twill tape in the package and just assumed it was still made out of cotton. I didn’t bother to look at the fiber content as I was running to the check out counter before closing. When I took it out of the package I found that it is now made of my friend 100% polyester. There goes the ability to shape it with steam and manipulation. Since I was still on my quest to wear it by 1:00 PM the next day, I decided to work with it. I sewed it on to the neck edge by laying it on the right side of the edge similar to how lingerie elastic is attached. I turned it under, fought with it and the iron around the shoulder curve, clipped it a tiny tiny bit on the outside so it would lay flat, and topstitched it. It proceeded to pucker and pleat no matter how much I eased it as I was sewing. Tearing out little black stitches on crepe late at night is not a fun thing. I got out my Steam a Seam Lite 2, fused the tape down all the way around the neck and then easily topstitched. The edge really lays nicely now and the twill tape adds that stabilizer that helps prevent gaping in wrap tops. The neckline on this is a little low but is easily compensated with a safety pin. I have an idea for how to make it shallower in the alterations section if you are interested.


How is the sizing of the pattern? What alteration did you have to make for size?

Have you ever tried on your almost finished garment, took one look in the mirror, then wanted to grasp your sharpest shears and cut it into very tiny pieces? Every seam matched and the darts were almost perfect but after I attached the skirt to the bodice it looked like a big Hefty yard waste bag with holes cut for the arms and neck. I truly know this is an accurate comparison, because I have done this to a Hefty bag when I didn’t have a raincoat or umbrella in a torrential downpour.

I am a firm believer in flat pattern measurement and knew it was essential with this pattern. As I tried on the bodice of the dress during construction I thought it looked great even when I pulled it down to simulate the weight of the skirt on it. I guess I didn’t pull enough because once I added the skirt the weight took all the shape out of it. I fought with it and won in the end. I feel obligated to make another one just to use what I learned while I was altering the evil black one.

Before I cut the pattern out I altered the sleeve circumference and the width of the sleeve cap. The bottom of the sleeve is very tight and will NOT fit most women. I could barely get the tape measure around my forearm at the measurement of the sleeve bottom. Just in case you are wondering – my forearms are not all that big. I slashed the sleeve vertically up the middle to the center top. I made a horizontal slash across the sleeve to the bottom of the armscye at each side. I spread the vertical line to add 1 5/8” to the sleeve bottom and spread it enough to add ¾ “ to the sleeve cap. This worked out just right and the sleeve fits well.

I measured the flat pattern before cutting from the side seam to center front of the garment, the shoulder to the bottom of the bodice, the shoulder seam width, and the sleeve length. The XXL were all well matched to my measurements. I didn’t measure the shoulder width because I knew that Loes Hinse leaves enough room in the XXL for me in the back. I measured the width of the bodice bottom, and with ease that was appropriate with my measurements. I tried the bodice on before attaching the sleeves. The neckline sits away from the neck quite a bit so the shoulder seam curved out and extended too far over my shoulder. I marked it where my “bones told me” the sleeve cap should be and then cut off the excess curve to ease out to the pattern armscye about ½ way down the front and back. I was concerned about the sleeve cap fitting into the altered armscye but knew that I had enough fabric to cut another pair if needed. They fit perfectly and came out over the top of the arm just the way a fitted sleeve should. The bodice still fit well at this point and hugged up under the bust just the way it was supposed to. I was confidently thinking that it would make a cute top if I added length and a closure. Then I attached on the skirt.

This is not heavy fabric but it was enough to pull the bodice into a hanging lump of fabric. The bodice hung too low with the waist at an extremely unflattering part of my anatomy straight from the bust. Remember the Hefty bag. My perfectly matched seams were sacrificed to the great alteration gods of sewing. I sewed a wider seam to 7/8” attaching the bodice and skirt. That raised the seam to where it was intended. If I sew this again I would make this adjustment higher up in the pattern before cutting then true the neckline slant. This would raise the V of the wrap. I then started to pin out the excess fabric on the sides until the skirt fell nicely from the waist. I discovered that little to no ease is needed at the “waist” with this style. I then started shaping the sides by taking it in at the underarm seam angling it in to waist seam until the seam was 1” then angling it out again to until it met the side seam approximately 9” below the waist. Now the bodice seams did not match so I maneuvered them around some, stitched the seam again, and back to matching seams. I pressed the seam towards the bodice side and I had a fitted dress, but I could still get it on over my head without a zipper.


How were the instructions?

The instructions were sufficient if one was sewing a sheer lightweight dress. Different methods are needed for other fabrics. The directions mention pressing a little at the end. This dress needs to be pressed a lot during construction for it to end in an attractive garment. I always press as I sew each seam before doing the seam finish then again after.


What did you particularly like or dislike about the pattern?

I really like how the finished neckline follows the curve of the shoulders and neck. The mock princess seams curve with the line of the bust perfectly and fall from the shoulders just as they should. I think this also helps reduce the gape usually associated with wrap styles because it doesn’t have to wrap all the way to the side around so many curves. The method for inserting the godets is wonderful, and if followed creates a perfect point at the top with the back matching the front. I did sew from the hem up on those seams to help this. The evil black polyester crepe shimmies and stretches easily so it helped to keep them where they were supposed to be. The second seam sewn made one side higher at the waist. My sewing teachers would not approve, but I decided to just trim it so it matched the other side and it worked out perfectly. The godets also add a lot of fullness without it falling from the waist in an unflattering manner.


Did it look like the photo/drawing on the pattern envelope once you were done sewing with it? How do you like the finished project? Would you sew it again?

I believe it looks like the photo and it is very comfortable to wear because everything “stays where it should.” I think it makes a nice “little black dress” and is versatile to dress up or wear under a jacket. My original intent was to make a sheer version and layer it over a slip type dress of a solid. I may still do that but it isn’t high in my priority of projects at this time. Now that I have it fitting so well I feel obligated to do something with it; I might just tackle that idea of a blouse. By the way, the dress was totally finished and pressed 1 ½ hours before I had to leave for the wedding.

Friday, May 23, 2014

Indianapolis Fabric Love


I love to visit Indianapolis!

I love the fabric stores in Indianapolis!

Which is one of the reasons I love to visit Indianapolis.

 Indianapolis is this sleeper of a city that isn’t commonly thought of as a destination. Until you visit. There are so many interesting things to do there. The downtown is one of the most vibrant moderate sized ones that I have visited and most accessible by walking. There are museums, sport venues, excellent dining, beautiful parks and this great canal the winds though the city with a walking path. It is also an easily drivable city if you Google where you want to go or use the GPS on your phone. Think lots of one way streets.

Now to the important stuff - 3 wonderful fabric stores.


There are 3 wonderful fabric stores in the city that are a must visit for the fabric obsessed. This is my third visit. Two of the stores I have been to each time. I discovered another hidden little gem last week that will be added to my priority list of things to do. One is right downtown and the others a short drive.


I found my kindred fabric spirit at Erin Young Designs.  Visiting with Erin Young and a pilgrimage to her store is now my priority first stop for our Indy trip each fall and spring. It is so fun to talk design ideas and fine construction techniques. I love to peek at her latest bridal creation and be tempted by her fabric acquisitions.  The entire staff is as engaged in this process as the fabric obsessed customer. Erin Young and her assistant are both formally trained in fashion design. They get all motivated about fabric, design and construction just like those of us who are fabric obsessed. After all, fabric acquisition is a whole experience for the fabric obsessed. It isn't simply bringing home a chunk of textile.

Erin Young's primary business is bridal and formal wear design. Like any fabric obsessed person she couldn't just stop there. Her store has a small selection of handpicked apparel fabric for their unique prints, fiber content, hand, drape, patterns, weaves and colors. They have been chosen because they are fascinating little treasures. Those little treasures immediately sent me into a creative muse imagining what their destiny should be. She has added enticing trims to the selection also. The best tactile experience this trip was her silk cashmere blend double sided cloth. I have never felt anything like it in my long textile life. She plans on a cape class this fall so she is adding some wonderful wools for that lucky crowd of people. She also has beautiful formal wear fabric sale.  I could easily have said, "One of each please." I think after a few visits I am coming close to that fulfillment of that idea. Unfortunately, despite the reasonable prices for the quality of fabric offered, even I have to be prudent at times,

She stocks a small selection of on trend independent patterns that are reliably drafted with high standards.  If you live in the area sign your child up for one of her sewing experiences for kids. Maybe you will find a group or class for yourself too. Regardless, stop in and say, "Hi!" for me and buy some fabric. I would hate to see it stay on the shelf. It needs a good home.

This is a hidden little gem of a store that you have to find. Literally. It is off in this cool little neighborhood. You will notice the bridal store first, then see the sign and still wonder about where to go. Enter the bridal  store and enjoy your stroll through those beautiful designs. Then proceed to the back of the store where all the cool creative stuff occurs. The fabric for sale is nestled back there with those that understand their potential.

 
When you think Crimson Tate think two words. FUN! INSPIRING!  Also, think about this folks. I don’t quilt. Crimson Tate is a quilt store. Their fabric is so unique and the store has such a good vibe that I just have to go there. I always find some cool fabric that I can use for clothing or accessories. My favorite fabrics to “pet” there are the Japanese cottons, Liberty of London, and their great graphic prints. They also encourage garment construction. They have samples made of their fabrics and a selection of patterns that will entice you. Their ribbon selection is equally intriguing along with their
notions and other little cool items they sell. The biggest appeal for me is the staff. They are always upbeat and encourage my enthusiasm. Here is the one of the biggest compliments I can think of in regards to this store. If I lived there I would probably take quilting classes because I so love the fabric and the store/staff. I would just want to be part of that energy.


The French Seam stocks “you have to touch me right now” fabric. Walk in the door of this elegant little shop and you will just itch to see what fabric you have to buy. This mom and daughter enterprise knows their fabric. They focus on high quality fabric for apparel sewing but also offer a wall of beautiful quilt fabric. A large portion of that can be adapted for apparel also. They feature a variety of top and dress weight prints and solids that will not find be found elsewhere. They remember to include the ever elusive selection of bottom weight fabrics in a variety of textures, colors and fiber contents that is often overlooked in other stores. Their selection of prints, dress and top weight fabric will tease and torment you. Not only are they visually appealing but their hand and drape is remarkable. They are my most likely to be petted fabric in the French Seam. They have a large selection of on trend patterns from independent pattern companies plus Vogue and KWIK Sew. Their button selection is comprised of those intriguing ones that always seem to be housed in the clear cylinder tubes.  Those little things just scream for me to peruse and purchase. Buttons make or break a custom garment. These will only put the finishing touches on one.

Talk about serendipity, their anniversary sale is the same weekend in the spring my husband and I visit Indy. His reaction? “Oh swell.”

Thursday, May 15, 2014

Important Discovery: Korean Pojagi

I discovered something I need to learn more about. Korean Pojagi. The contrast of seaming with sheer fabrics marries that element of construction into design that fascinates me. This is the same idea I spoke of in my  Chaldo Ralph Rucci post from last week. Take a look at this blog post. The textiles embrace beautiful simplicity.
Sri Threads Blog


While I was down the Pinterest rabbit hole I also came across Japanese Boro. The stitches are fascinating. I see some studying in my future.Take a look at this Pinterest Board by Kit White.
 

Friday, May 9, 2014

Rucci: Master of Design Details & Textile Manipulation


Chaldo Ralph Rucci’s garments are neither flashy nor outrageous. They are fascinating. Rucci is the master of design details. I am impressed and fascinated with his understanding of textiles in relationship to construction. He exploits it to create unexpected elements and drape that capture my attention. For Rucci the delight is in the details. What really makes me want to stop and examine his garments is the infusion of design details. This may sound crazy but he does seams impeccably. They are often included as a design element rather than just a way to hold textiles together. One really has to see his garments for yourself. Pictures and film cannot tell the whole story he builds each design around. I discovered his work when I was fortunate enough to see some of his past designs at an exhibit in Charlotte a few years ago. Leaning as close as I possibly could to the garment, I spent a great deal of time looking at all the little details and the way he exploits the fabric he uses. Please enjoy his 2013 runway show. Delight in the details
.

Saturday, May 3, 2014

May I Have a Little Spring with that Sunshine?


I decided to import a little spring into my world since the real spring refuses to arrive. The photos from this project keep popping into my head during this long succession of dreary cold days. I think this is one of my favorite projects despite having made it quite some time ago. There is just something about sweet little girl clothes that capture the imagination. The pattern isn't available any longer, but there are very similar ones out there.

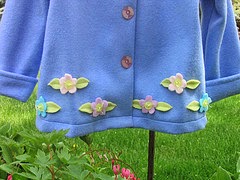
I was looking at the children’s patterns hoping there was something new for my little boy when I saw this pattern for girls. I fell in love with it and decided to make it for my 6-year-old niece. Simplicity 5946 is a woman’s and girl’s multisize coat and hat pattern. The pattern envelope recommends it be made of fleece, with a border print, but it would also accommodate a light coat weight woven. It is a swing style coat with an open pleat in the back and easily lends itself to surface embellishment.

I chose a periwinkle single sided fleece with contrasting fleece for the surface embellishment. There were not any border prints that I liked so I decided to make flowers of my own and apply them to the coat. I cut the flowers and leaves out of the contrasting fleece. I sewed the leaves on with a single line of stitching through the middle to mimic the vein in a real leaf. The flowers were cut from 3 different colors of fleece. I did not sew them to the coat but attached them with a yellow button for the flower center using 6 strands of embroidery thread pulled through the holes once, with the thread ends facing the outside of the coat, then triple tied for to look like stamens in a real flower. There are three flowers on the bottom of each front side and a flower on right front collar. Leaving the edges loose on the flowers and leaves creates a three dimensional appearance to the design. This isn’t a problem with fleece since it doesn’t ravel. This technique was suggested in the
pattern directions.

The hat was made from the same periwinkle fleece but it doesn’t stretch. I created a contrasting band using the double sided pink fleece that I had for the flowers. This has a fair amount of stretch like most fleece so it allows the hat to hug the head. The pattern calls for a flower on the band but I put it on the top where all the seams meet.

Using the fabric measurements on the back of the pattern leaves a lot of extra fabric. There is also a lot left of the contrasting fabric because of how little is needed for the flowers. I made a pink scarf to go with the jacket and a small purse with the excess fabric. The purse is a small pocket style with a pink braid strap that I knotted and raveled at the end. I sewed across the braid to limit the raveling. The same flowers from the coat were put on the front of the purse.

Beware of the armscye size! The circumference of the armhole is extremely small. I unfortunately didn’t discover this until I had cut out the pattern was ready to insert the sleeves. My niece lives far away from me so I had to make adjustments using measurements given over the phone. In the end I inserted a “gusset” or diamond shaped piece of fabric in the underarm seam. It isn’t the neatest looking part of the finished garment, but it does allow enough space in the armscye for comfortable wear. Make sure you use flat pattern measurements to select the size for this pattern. There is a very generous amount of design ease and could easily be too big using the envelope size measurement. I like the roll up sleeve design. Children’s coats often become too short in the arms. With this full style it will allow the child to wear the jacket longer by just making the cuff narrower. It was a great feature since I was sewing this for someone that couldn’t try it on. I didn’t have to worry about sleeve length at all. The instructions that I read in this pattern were good but to be honest I didn’t follow them. This is a simple pattern so I didn’t really need them with the exception of the flower design, the back pleat stitching, and hat assembly.

The coat looks exactly like the pattern illustration. I found the band on the hat to be significantly narrower than the illustration. It makes it look quite different and necessitated putting the flower embellishment on the top of the hat instead of the band. The collar in this pattern lays exceptionally well. I used fleece for the under collar, instead of the broadcloth suggested by the pattern, and it still folds over well. The under collar is cut a little smaller, like I was taught it should, so it pulls the upper collar slightly under and holds the fold.

I was fun to sew a “fru fru” garment for a little girl, not something I usually get to do. I would sew this again and might try the women’s size without the “fru fru” for myself. I would definitely redraft the armscye and upper sleeve for better fit.

Tuesday, May 1, 2012

Cutting Line Designs: To THE Point


I updated some old pattern reviews to transfer to this blog. This complicated project lives in my memory quite well, so it is easy to recall the process I used to create the garment. I cut and pasted the description below from The Sewing Place's web site. I certainly wish it had been available when I made this. Pay special attention to "very loose fitting, 78 inches, and intermediate to advanced sewer." The flat felled seams in this are not the traditional version. I chose the traditional.

Pattern Description:
"Very loose fitting, knee-length wrap coat in one size. Front and sleeve seams establish fashion lines. Cut-on facing; flat felled side, shoulder and sleeve seams. Thoughtful, unique assembly order and 12 miters make this a fun project for an intermediate to advanced sewer. "To The Point" Coat is 78 inches around from front edge to front edge. There are vertical lines that go from the shoulder to the hem on the front and back to increase or decrease this measurement."


Pattern Sizing:
This is a very full coat. We all know that "one size fits all" is relative to how big the pattern is. In this case it errors on the high end of sizing. I made a muslin with a friend who was also sewing it. We cut out drastic amounts to get the garment so it wasn't overwhelming. I am a 5'4" and it falls at mid calf on me despite removing several inches of length. I reduced significant amounts from the back, but if I make again would leave a few inches more. The back is not sized as proportionally large as the front. I removed about 25" total. I did not use the alteration lines on the pattern. I wanted the fall of the lapel to look more like the fashion illustration. The point of the lapel on the muslin fell below my waist. When I altered the pattern I made my adjustments to reduce the circumference in the lapel area, then redrafted the diagonal lines.


Did it look like the photo/drawing on the pattern envelope once you were done sewing with it?
I used a rayon/poly blend with an interesting weave so the finished garment did not have as much body as the fashion illustration depicts. However, the alterations I made to the lapel helped it to look more like the picture then the original pattern. I also left off the pockets. A fabric with more body would look closer to the illustration.
 

Were the instructions easy to follow?
I liked the instructions for this pattern because they were detailed where it was needed and introduced several new techniques. I also introduced me to Steam a Seam Lite 2 in the narrow rolls, and this product is now a staple in my sewing supplies. It would have been much more difficult without it. I really liked the way it directed me to construct all the miters, they were easy, sharp, and consistently the intended angle. Another technique that I thought was great was her back neck facing application. The curve is shaped quite different than the traditional facing and attached to the front in a unique way. It is fused down then you top-stitch over it. It lays wonderfully.
 

What did you particularly like or dislike about the pattern?
The large sizing was troublesome and a great deal of work to adjust. The length of the lapel was less flattering before alteration. The finish garment does flow nicely and is flattering.

This would be a great pattern for someone with the sewing skills who is taller or whose build can carry it well. Make sure you are confident in your ability to alter patterns and your drafting skills if you are on smaller end of pattern sizing. Mine is a very basic rendition of this. There are so many wonderful embellishments that could be showcased on this pattern. Design possibilities are quite open for contrasting fabric, trim, and surface techniques. This pattern is less fitted then what is popular right now but pairs best with slimmer fitting coordinates.

This project took on a life of its own and I swore I would never make it again at the time. In fact I really didn't like it for awhile after completion. Having said that, I have worn it many times, and I never fail to get a compliment. It flows nicely and it displays the weave of the fabric well. Unfortunately the interesting weave doesn't show up well in the pictures.You can see a version of this jacket without the lengthwise alterations at Ann Smith's review. I do not believe that the pattern is available from Louise Cutting any longer.